Feeds:
Posts
Comments

Archive for the ‘Uncategorized’ Category

Hi all! I’m back and baking along to the Holiday Baking Championship again. This will be my 3rd time doing it. And why am I baking along? To challenge myself under time constraints and learn some new skills. So let’s get into it!

If you missed week one on Food Network, the preheat was to make a quick bread wreath in 2 hours. The six options of flavors were: chocolate orange, citrus ginger, cranberry orange, spiced pear, maple pecan, and apple cinnamon. Out of fairness, I randomly drew my flavor and got . . . cranberry orange!

I have a cranberry orange bread recipe that is my favorite. But I want to challenge myself with baking new things and not be so tied to a recipe, so I had the recipe out for a quick glance and threw a bunch of ingredients in the mixer to see what happened.

I was pleased to see that the bread came out of the oven looking well risen and smelling of spices and brown sugar. It took very little time to prepare and bake. While it baked, I made a cranberry jelly, melted some butterscotch chips, and made cranberry butterscotch “bells” for decoration. I took some green colored white modeling chocolate and made holly leaves. And I also whisked up an orange glaze.

My error in this preheat was to not cool the bread enough before decorating. The holly melted and I had to add some more before time was up.

Speaking of time, 2 hours was way too much. I spent half the time twiddling my thumbs and washing dishes. Overall, this really only took me about 70 minutes. I must admit that though the bread was good, it made me think of an upside down cake. And the “bells” were not good. I should have used the peanut butter chips and had pb&j bells.

For the main heat, 2.5 hours were allotted to make a winter hat cake. I don’t have any. So I looked on Amazon for inspiration. Found one!

My cold weather inspiration for this cake was from when I worked at the zoo over the holidays for Zoolights. This was almost 20 years ago. But there would be some chilly nights and I warmed up with vanilla chai tea lattes. So good! Therefore, I decided to bake a vanilla chai sponge cake with vanilla swiss meringue buttercream.

The cake and frosting used 10 eggs! I’m definitely going to have to keep my baking stock up this season. For the chai adaption, I emptied the leaves of a chai teabag into the batter. I also made a simple syrup and steeped another teabag in that.

While the cakes baked, I made the buttercream. I normally use American buttercream but I had egg whites left over from the cake and did Swiss meringue. After adding 3 sticks of butter to it, I decided to omit the last stick that the recipe called for. That’s why I normally don’t make this type of buttercream. So.Much.Butter!

The decoration started 90 minutes into the challenge. I filled some piping bags with white, red, and gray buttercream. I ran out of red food coloring (must get more), so it was more pink in color. Then I piped to try and resemble a knitted pattern. I had baked a cupcake for the top poof. With about 15 minutes left in the challenge, I piped my name on it for the embroidered name twist.

I was done. There was nothing more I wanted to do to it. I loved it. I had 10 minutes left on the timer.

So I think I did a very good job on week one. I managed to do both challenges with time leftover. I’m sure not every week will go this smoothly. But pumped up from these bakes, I’m looking forward to week two.

Read Full Post »

Hey guys.  We are so close to the finale of Holiday Baking Championship.  And I wish I had completed Week 6’s challenges before the finale, but we had a very busy week.  You see, we had a home bar installed which had been planned for 21 months and in the build process for 10 weeks.  No excuses, but there it is.  I baked the preheat but will post the main challenge with the finale post.

23AC1B11-C201-4133-927B-3D2BE6EE08FD

So in the preheat, the baker’s had 90 minutes to made a classic chocolate dessert with 2 common pantry items.  I chose the challenge that competitor Sarah had: chocolate chip cookies with olive oil and balsamic vinegar.

I decided to make a chocolate chip shortbread cookie tree.  I left out about 2-3 tablespoons of butter and substituted that with olive oil.  Then I rolled out the dough and cut out graduated sizes of stars.

A097BF4D-1BFD-4F25-B808-2332CCA036C0

Once the cookies were baked, I piped on some semi-sweet chocolate and stuck them in the fridge to firm up enough so they wouldn’t completely stick together.  I then whipped up a frosting with cream cheese, butter, powdered sugar, and balsamic vinegar.

57BBD867-0E44-4260-A3EB-0B494DFAEA0F0C8F3481-B2A6-46D7-A8F4-0F9B300659C3

The cookies were stacked large to small and I piped the frosting on to the tips.  This was the first preheat in awhile that I finished in time and was happy with the result.  I can’t say I tasted too much balsamic, but it was well balanced with the cream cheese.  And the olive oil was there but pretty hidden in the cookie.  Not sure how else to incorporate those two ingredients where you could and would want to taste them.

8A479B76-084B-4289-AE0E-B4E1791B613E


Chocolate Chip Shortbread Cookies:

14 Tbs butter, softened
3 Tbs olive oil
1/2 cup packed brown sugar
1/3 cup granulated sugar
2 teaspoons vanilla extract
1/2 teaspoon salt
1 large egg yolk
2 1/2 cups all-purpose flour
2 cups mini semi-sweet chocolate chips, divided

Beat butter, olive oil, brown sugar, granulated sugar, vanilla extract, and salt in large mixer bowl until creamy. Beat in egg yolk. Gradually beat in flour. Stir in 1 1/2 cups mini chocolate chips.

Roll half of dough to 1/4-inch thickness between two sheets of waxed paper. Remove top sheet of waxed paper. Cut into shapes using cookie cutters. Lift from waxed paper; place on parchment lined baking sheets. Repeat with remaining dough.

Bake in preheated 350° F oven for 9 to 11 minutes or until golden brown. Cool on baking sheets for 2 minutes; remove to wire racks to cool completely. Pipe with remaining melted chocolate.

Read Full Post »

I am determined to see this challenge through.  Even when my kitchen is completely enclosed in plastic from the restoration company, where there’s a will, there’s a way.  There’s also a mother who lives 20 minutes away.

Yes, that’s right.  The water is still turned off at my house and now the kitchen looks like a scene from the movie Outbreak.  Sounds like it could be a couple more weeks until our house is habitable again.  What else can be thrown at me during this baking challenge I’ve taken on?  Well, in less than 2 weeks, I leave to celebrate the holidays with my sister and her family in France.  There will be no baking in their kitchen since it’s a complete disaster.  But I may see what I can do in the house we’ll be staying in.  It’s an adventure, that’s for sure.

This weeks challenge was made in the kitchen of my parents.  My mom used to bake a lot when we were kids.  That’s probably where my love of it came from.  But she only bakes a handful of times a year now, so her equipment and pantry are very limited.  She’s got the basics: flour, sugar, eggs, butter.  As for assembly; cookie sheet, stand mixer, and holiday sprinkles are about the extent of it.

The preheat this week was to make a treat showcasing toasted marshmallows in 45 minutes.  I managed to snatch some marshmallows from under a tarp on our kitchen table and headed to my parents house.  After some digging there, I found a jar of molasses and we were in business.

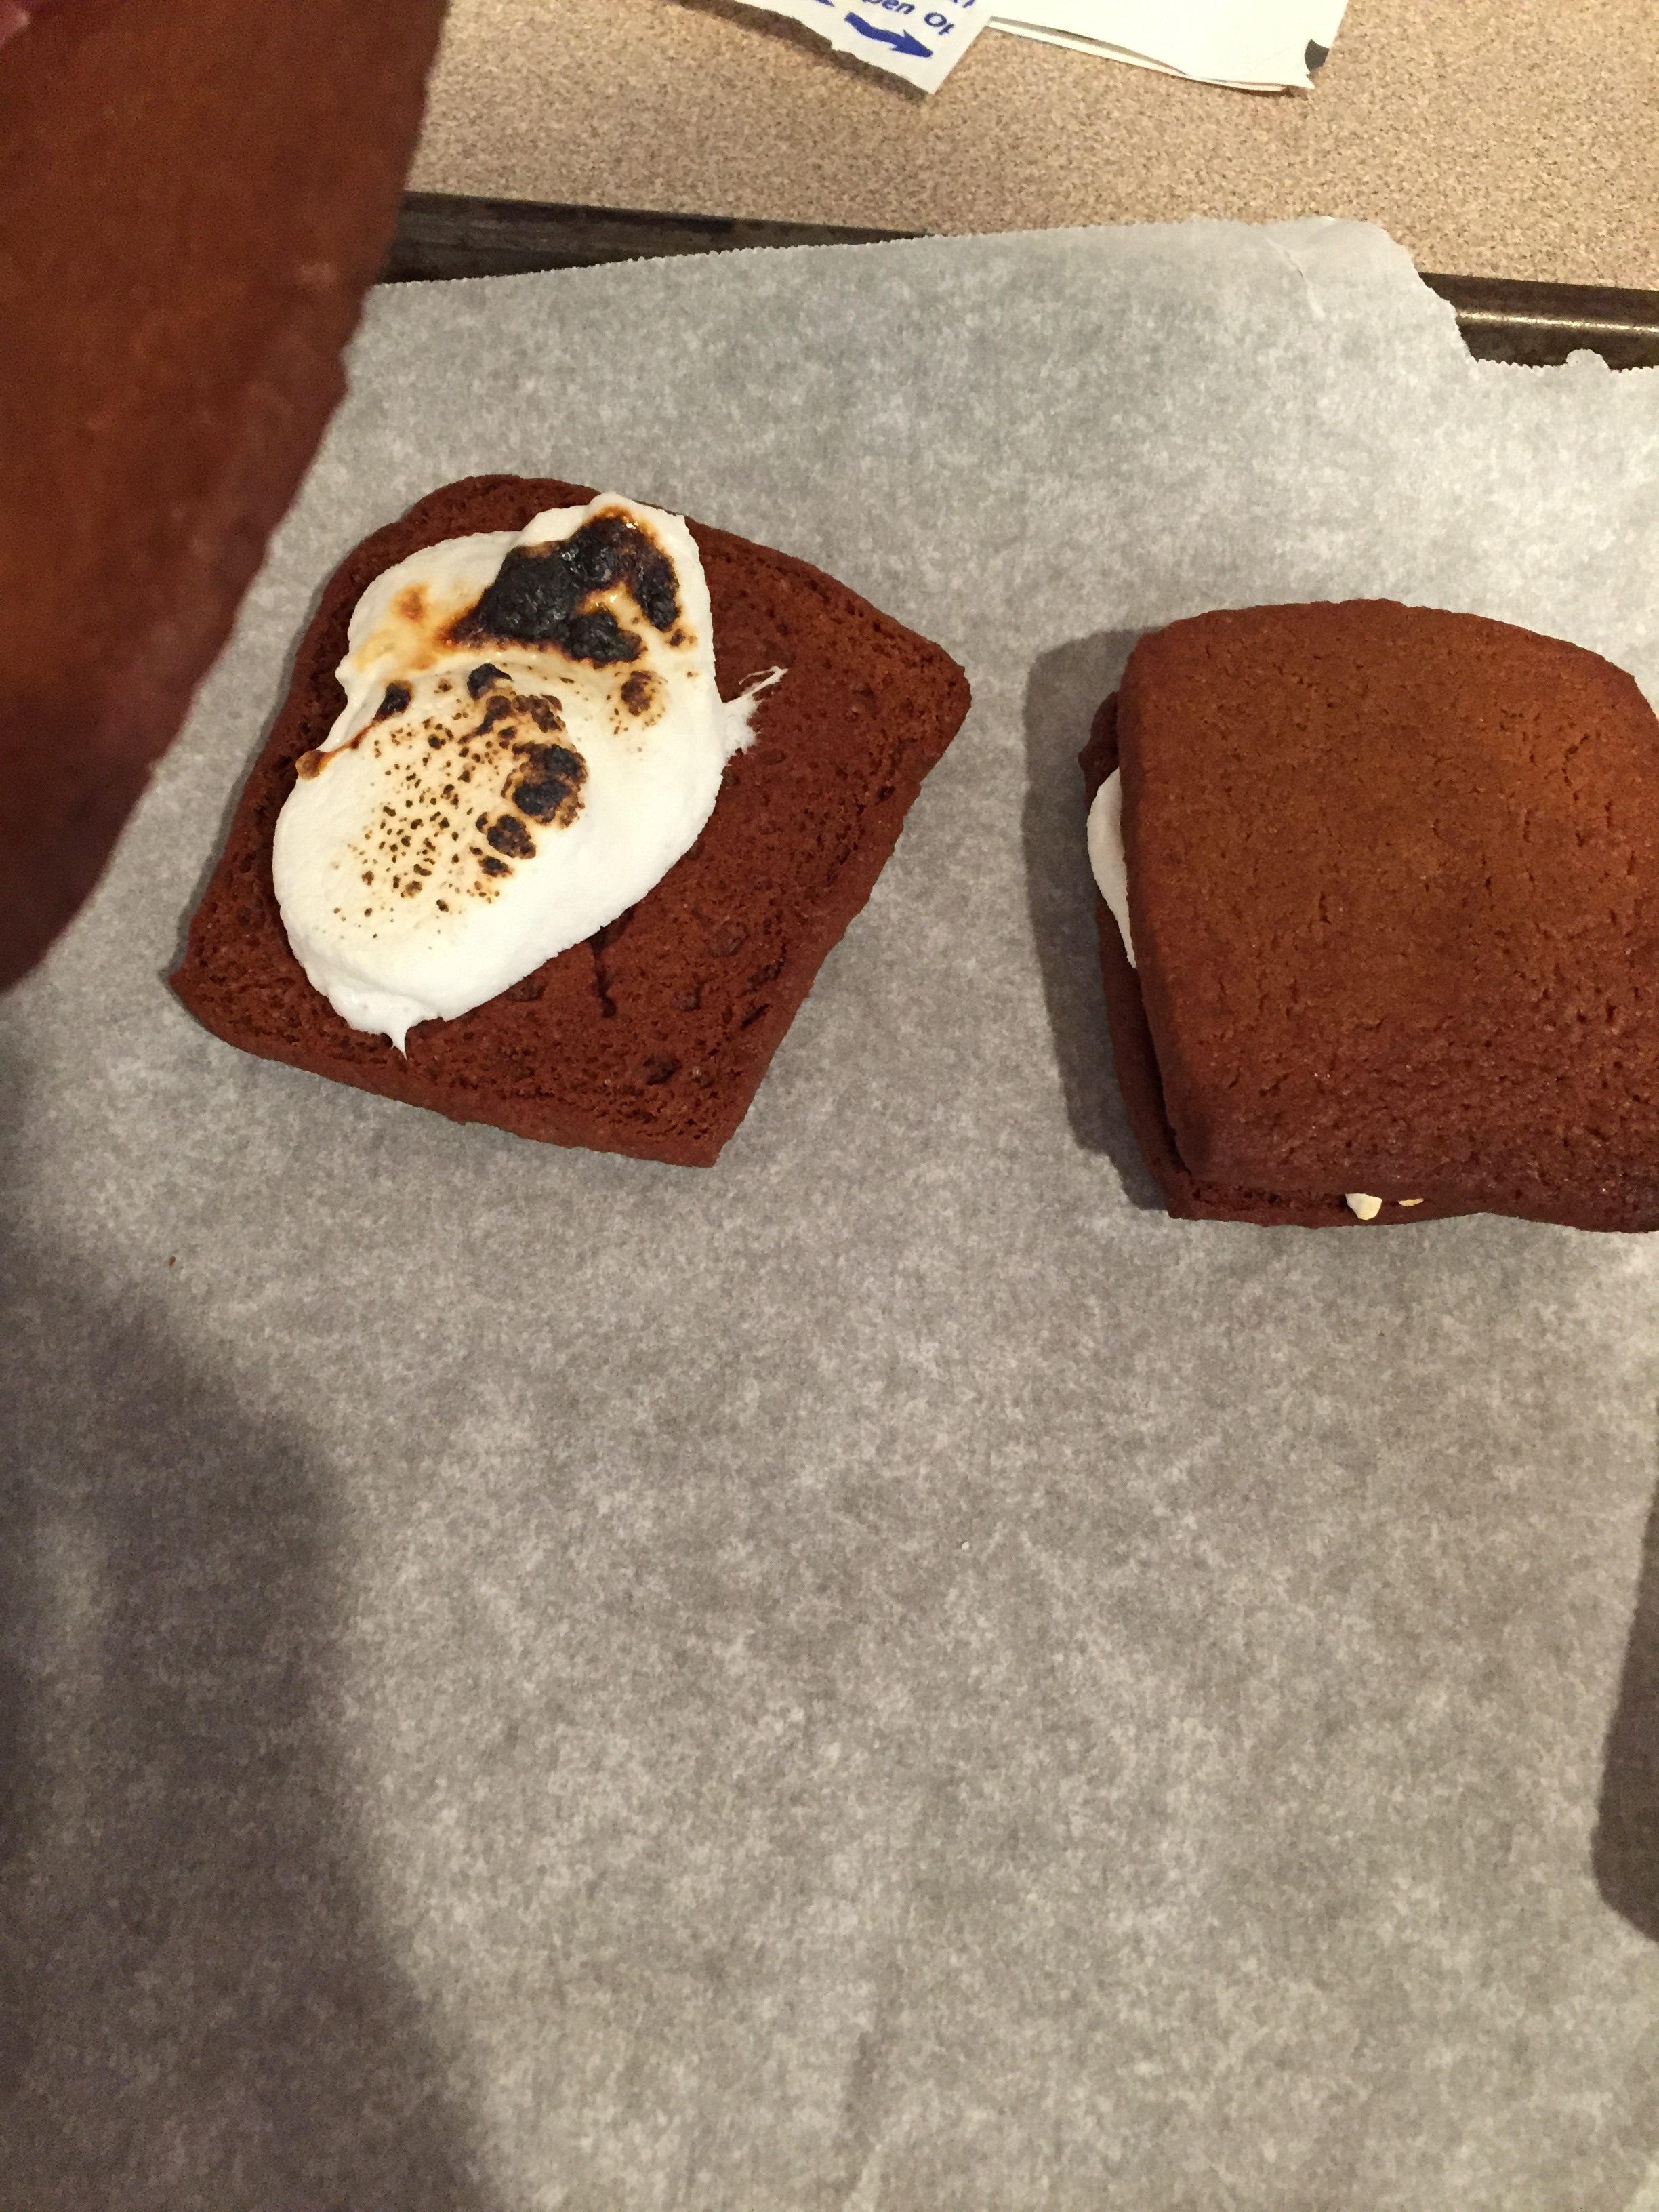
I whipped up a batch of my favorite spicy gingerbread cookies.  Rolled out the dough and used a knife to cut out squares.  About 8-9 minutes in the oven is all it took and while they were baking, I melted some chocolate and spooned it into a plastic ziplock bag.  I located a small torch in a drawer which was a much better option than cooking marshmallows on the stove.

image

Assembly time.  Torch the marshmallow, sandwich between two gingerbread cookies, and drizzle chocolate on the top, sprinkling colored sugar for holiday flair.  Simple enough, but I realized that the marshmallows would need to be cooked more to get gooey all the way through and smash down.  I didn’t have much time left so I stuck a plate of marshmallows in the microwave and heated for 20 seconds.  Spooned them on the cookies and toasted from there.  Voila!  Gingerbread s’mores.  They were good, but I thought the gingerbread overpowered the marshmallow slightly.

image

image

Onto the main heat: 2 hours to make a blinged out yule log.  Didn’t have much in the means of bling in this kitchen, but I had an idea.

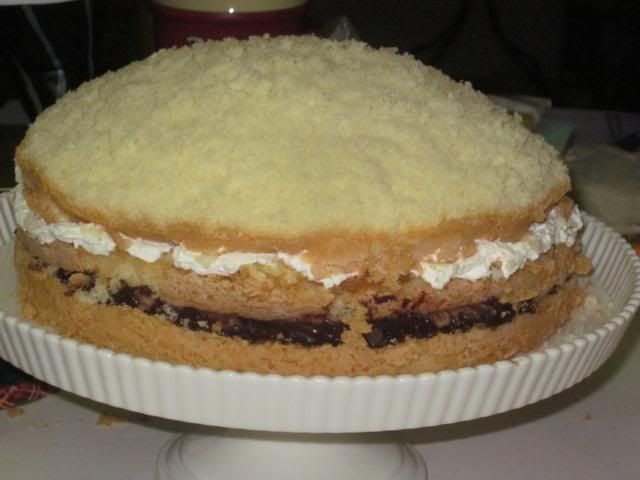
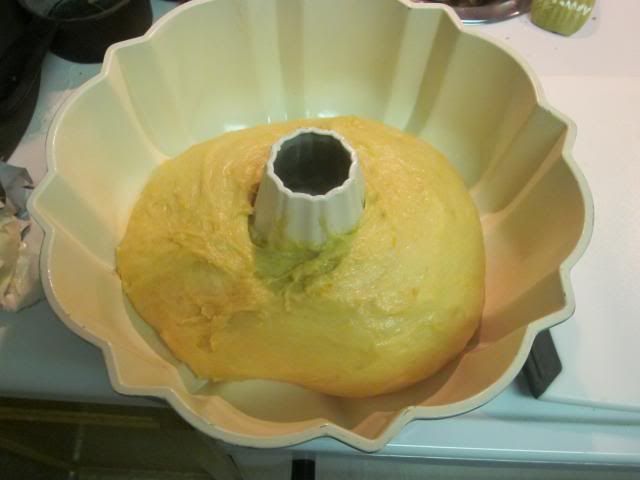
The torch I used earlier would be great to toast meringue to look like a log.  And meringue goes really good with lemon.  The first thing I did was grab a saucepan and make lemon curd.  It needed time to cool and the jelly roll cake would only take 14 minutes to bake, which was the 2nd thing I whipped up.  After the cake had a few minutes to cool, I turned it out onto a tea towel dusted with powdered sugar (which also dusted me and the floor in the process) and rolled it up.

image

image

Assembly would be relatively quick, so I started on the decorations.  Pulled sugar!  It was the first thing I ever wrote about on this blog.  While being somewhat successful that time, it also resulted in slightly burnt fingers and a broken mercury thermometer.  So you can see my hesitation pulling out the replacement thermometer I bought that was exactly the same, mercury.

Carefully started heating the sugar and water in a saucepan with thermometer holding on to the side.  Used a pastry brush to brush water on the sides so as not to have sugar crystals.  Walked to the other side of the kitchen to figure out what I could use as gloves since my mom didn’t have any, and came back to find my sugar caramelized.  Great!  But rather than dump it and start over, I used a fork to make little droplets on a silpat which I would call “tree sap.”  The twist in the challenge was also to add a crunch so that solved that problem.  I was originally thinking of rolling the log in crushed shortbread and then topping with meringue, but I was worried the meringue would make it soggy.  And now I didn’t have to go that route.

image

image

Got another saucepan out and started on the sugar again.  Watched it like a hawk and took it off the heat as soon as it hit 298F.  Then I poured it on a clean silpat and prayed I wouldn’t burn myself.  Sugar gets hard pretty fast.  Once it was cool enough to handle, I added gel color and started pulling it.  Holly leaves would be super easy to pull.  I just pulled a piece about 5 inches long, and then grabbed it by the sides and pulled outwards in 3 sections.  Then I took a knife and slightly scored veins.

image

I poured a little more sugar on the silpat, colored it red, and tried to blow sugar berries.  One sort of worked, but it was more translucent than I wanted.  So I just took some sugar and rolled them into balls.

With the decorations done and 20 minutes left on the clock, I went into panic mode, dropping spatulas and such as I went.  Unrolled the jelly roll and spread on the lemon curd.  Rolled it back up and put it on a plate.  Whipped some egg whites and made a meringue, spread it on the cake, and got the torch going with 4 minutes to go.  That’s when I figured that my cake would be adorned with uncooked meringue, but it really didn’t take that long to brown.  Grabbed some “sap” and literally threw it on the cake.  Then I carefully picked up the holly and berries, placed it, and threw my hands up with the ringing of the timer.  Made it!

image

image

image

image

image

And I must say, I think my blinged out yule log rocks!  This is the challenge I’m most proud of so far.  The cake had a great crumb and was really freaking good.  So good I had 2 pieces.  Also, no mercury spillage.  Success!


Recipes:

Gingerbread Cookies:

1/2 cup sugar
1/2 cup butter, softened
1/2 cup molasses
1 egg yolk
2 cups flour
1/2 tsp salt
1/2 tsp baking powder
1/2 tsp baking soda
1 tsp cinnamon
1 tsp ground cloves
1 tsp ground ginger
1/2 tsp nutmeg

In a large bowl, cream together the margarine and sugar until smooth. Stir in molasses and egg yolk. Combine the flour, salt, baking powder, baking soda, cinnamon, cloves, ginger, and nutmeg; blend into the molasses mixture until smooth. Cover, and chill for at least one hour.

Preheat the oven to 350°F. On a lightly floured surface, roll the dough out to 1/4 inch thickness. Cut into desired shapes with cookie cutters. Place cookies 2 inches apart on ungreased cookie sheets.

Bake for 8 to 10 minutes in the preheated oven, until firm. Remove from cookie sheets to cool on wire racks. Frost or decorate when cool.

Lemon Jelly Roll Cake:

The Cake

3 eggs
1 cup sugar
2 Tbs lemon juice
1 Tbs cold water
1 cup all-purpose flour
1 tsp baking powder
1/4 tsp salt
1 tsp lemon zest

The filling

1 cup granulated sugar
3 Tbs all-purpose flour
1 egg, lightly beaten
1/2 cup water
1/2 cup lemon juice

Preheat over to 375°F.  Line a greased 15-in. x 10-in. x 1-in. baking pan with parchment paper. Grease the paper; set aside.

In a large bowl, beat eggs for 3 minutes. Gradually add sugar; beat for 2 minutes or until mixture becomes thick and lemon-colored. Stir in lemon juice and water. Combine dry ingredients and zest; fold into egg mixture. Spread batter evenly in prepared pan.

Bake for 12-14 minutes or until cake springs back when lightly touched. Cool cake in pan on a wire rack for 5 minutes.

Invert onto a kitchen towel dusted with confectioners’ sugar. Gently peel off waxed paper. Roll up cake in the towel jelly-roll style, starting with a short side. Cool completely on a wire rack.

For filling, in a small saucepan, combine the sugar, flour, egg, water and lemon juice. Cook and stir over medium heat until mixture comes to a boil. Cook and stir for 1 minute or until thickened. Remove from the heat; cool to room temperature.

Unroll cake; spread filling evenly over cake to within 1 in. of edges. Roll up again. Place seam side down on a serving platter.

Pulled sugar:

Heat 1 1/4 cups granulated sugar and 100 ml water in saucepan over medium/high heat.  Bring to a boil and add 1 tsp lemon juice.  Continue to heat until mixture reaches 298°F and remove from heat.  Pour on silpat and use a scraper to fold over liquid until it becomes thicker and cool enough to handle.  Pull sugar and shape.

Read Full Post »

Oh my! Has it really been 8 months since I last blogged?  My apologies.  The holiday season is coming up, I’ll try to keep you better updated.

Decided it was about time to get back into the Daring Baker’s Challenges at the Daring Kitchen.  And this month, it was Sachertorte.

I have to say from the start… not my favorite.  But I’m not a big fan of chocolate and fruit.  This chocolate cake was drenched in apricot jam and topped with a chocolate/water mixture.  I was disappointed I didn’t like it better.

The cake was quite simple to make, and I had all the ingredients on hand.  The chocolate sauce on top stumped me though.  It looked shiny like a ganache, but used a sugar/water mixture rather than heavy cream.  Water and chocolate?  I thought for sure the chocolate would seize up, and it did!  It looked like dry brown sugar initially.  Had to keep adding water to get it to thin back out.  But nothing I did could completely save it.  So I spread it on as best as I could and attempted to cover it up with a white chocolate spider web.

Overall, it didn’t look terrible with the decorations.  But I had one small piece and took the rest to work because it just wasn’t my cup of tea.

The October Daring Bakers’ challenge was brought to us by Korena of Korena in the Kitchen. She took us to Austria and introduced us to the wonders of the Sachertorte.

Read Full Post »

Lady-part bread, say what?  Don’t worry, I’ll get there . . .

Hi!  It’s been awhile since I’ve done a Daring Baker’s challenge!  Wish I could say it was due to traveling (went to Australia in November), but mainly I’ve been working my butt off.  Glad I found the time for this month’s challenge: beautiful bread.

Bread is always fun to make.  Very satisfying to watch a lump of dough expand, then bake into light, mouth-watering deliciousness.  We had two recipes to choose from and I picked the one that resembled a cinnamon roll, of course.

No issues arose with the recipe.  The only thing I did differently was cut the cinnamon from four tablespoons to three because I’m stingy and felt that three was more than enough.  And I didn’t top the bread with sweetened condensed milk as I felt it would be sweet enough.  What I didn’t expect to find in the finished product was the distinct resemblance to a, ahem, vagina.

Good recipe, though next time I may just roll all the layers for even distribution.

That’s all folks.  Will play catch-up soon and fill you in on what’s been going on in the last four months.

Ingredients

For the dough

1/4 cup (60 ml) warm water
3/4 cup (180 ml) warm milk
1 large egg
1/4 cup (60 ml) (60 gm) (2 oz) butter, softened
1/4 cup (60 ml) (50 gm) (1-3/4 oz) white sugar
1/2 teaspoon (3 gm) salt
3-1/4 cups (780 ml) (450 gm) (16 oz) plain (all-purpose) flour, approximately
2 teaspoons (10 ml) (8 gm) dry yeast
1/4 teaspoon (1 gm) cardamom, optional

For topping

1/4 cup (60 ml) of milk
1 tablespoon (15 gm) (1/2 oz) sugar

Between the layers

1/2 stick (4 tablespoons) (1/4 cup) (60 ml) (60 gm) (2 oz) butter
4 tablespoons (60 ml) (25 gm) (1 oz) cinnamon
1/2 cup (120 ml) (100 gm) (3-1/2 oz) sugar

For drizzling

1 can (400 gm) (14 oz) sweetened condensed milk

Directions:

1. In a bowl whisk the egg with milk, water, sugar, butter and yeast. Set aside
2. In another bowl sift the flour with the salt and the optional cardamom.
3. Add the liquid ingredients to the dry ingredients and knead until you get a smooth dough.
Note: This recipe requires between 3-1/4 and 3-1/2 cups of flour depending on the weather, humidity and the flour brand. Start with 3-1/4 cups and if you feel that the dough is too soft, add the extra 1/4 cup
4. Place the dough in a bowl you have brushed with some oil and cover it with a wet cloth and leave it in a warm place to double
(If you are tight on time you can heat your oven to 390°F/200°C then turn it off and place your dough in a glass bowl and place it in the warm oven with the wet cloth covering the bowl)
5. Turn the dough out onto a lightly floured surface
6. Divide the dough into 4 parts
7. Roll each part into a circle at least 20 cm (8 inch) in diameter
8. Brush the first layer with butter then sprinkle with sugar and cinnamon
9. Place the second layer on the first layer repeat the brushing and sprinkling and then do the same with the third layer.
10. Top with the fourth layer, this time only brush it with butter.
11. Using a knife make cuts that divide the dough circles into 8 triangles
12. Make cuts that go 2/3 of the way in the middle of each triangle. The cuts should not reach the base of the triangle nor the tip as you can see in the picture
13. Take the tip of each triangle and insert it into the cut you made and pull it from the underside
14. Arrange the triangles on your baking sheet
15. Pinch the two angles at the base of the triangle together
16. Brush the dough with milk
17. Allow to rest for 15 minutes during which you would heat your oven to very hot 500°F/240°C/gas mark 9 (rack in the middle). (Go for the hottest your oven will do).
18. Bake for 5 minutes on very hot 460°F/240°C/gas mark 9, then lower the temperature to moderately hot 390°F/200°C/gas mark 6 and bake for 15-20 more minutes
19. Take it out of the oven and allow to cool for 5 minutes then transfer to a wire rick and drizzle with sweetened condensed milk while it is still warm.

Read Full Post »

I’ve come to realize I make empty promises.  Not intentionally!  I would like to blog more, but time doesn’t seem to slow down enough for it.  With the holiday season approaching, my time will be stretched even thinner, but I’ll certainly try to update along the way.

So it’s been 3 months since I did a Daring Kitchen baking challenge.  I must admit, I wasn’t thrilled about this month’s which was Pot Pie.  And we could NOT make a sweet version, which in my opinion, doesn’t count as a baking challenge.  But alas, I was craving a Cornish pasty so I decided to give that a go.  Not exactly a pot pie, but it has all the same components:  savory filling in a closed pastry crust.

I looked up a couple of recipes and found Jamie Oliver’s version on a blog.  Not really wanting to make six pasty’s, I cut the recipe in half.  And the meat was marinated in Guinness over night.  I also left out the carrot in one pasty, as I’m not a huge fan of carrots in anything other than carrot cake.

Some baked potato slices and brown gravy accompanied the pasties.  My boyfriend highly approved the meal.  I’m just hoping we bring back the sweet for November’s challenge.

Hannah of Rise and Shine was our October 2013 Daring Bakers’ hostess and she challenged us to bake our own double crusted savory pot pies. Using any from-scratch crust and filling we choose, we were allowed to get completely creative with our recipe, showing off the savory flavors and fillings from our own home or region.

Read Full Post »

Hey guys.  I am back from my grand adventure.  Spent two amazing weeks in Barcelona, Amsterdam, and Cape Town.  Logged lots of hours on planes, but it was worth it.  Was finally able to do the one and only thing on my bucket list:  see a great white shark in person.  And boy, did they put on a show for me!  Flying out of the water, chasing seals, and showing off around the shark cage.  Beautiful animals!  The trip only deepened my love for them and filled me with a desire to see more.

Settled back in at home, but didn’t quite complete this months baking challenge, which was pie.  I decided I’d still make a pie, but was missing one or more ingredients from the three different recipes that was to be made.  Therefore I thawed out some leftover pie dough I made a month ago and whipped up a delicious butterscotch and meringue pie, which I had all the ingredients for.

Even recipes I’ve made before can turn out differently each time.  Butterscotch seems to be a hit or miss for me.  I added an extra tablespoon of cornstarch and an extra egg yolk to try and get a more solid pudding since I had 1% milk, not whole milk.  But it turned out a bit runny still.  The meringue didn’t help when it weeped all over the pudding.  Damn meringue!  Just goes to show that sometimes you should take the extra step and make a tried and true recipe than the quick and simple one.  Meringue is so easy yet so finicky!

The pie dough gave me more trouble.  I didn’t have pie weights or dry beans so I just put a mixing bowl on top of the crust when blind baking.  It didn’t work.  I had to take it off and then the crust bubbled up and the edges shrunk.  It was unusable.  Thankfully I had a graham cracker crust in my pantry and used that instead.  But I didn’t completely scrap my homemade crust.  I cut out a couple small circles, put them in the bottom of espresso cups, then filled those with pudding and meringue for mini desserts.  Worked well.

In conclusion, pie is not my friend.  I’ve known it for some time now.  But we get along as best as we can.

In other news, I’m sad to report that Paddy (my sour dough starter) has left this world.  I was a bad mom and let him become overrun by mold.  I tried to resuscitate him, but it was too late.  He was a year and a half.

Rachael from pizzarossa was our lovely June 2013 Daring Bakers’ host and she had us whipping up delicious pies in our kitchens! Cream pies, fruit pies, chocolate pies, even crack pies! There’s nothing like pie!

Read Full Post »

Another baking challenge completely just under the wire!  Phew!  Really wanted to do this one but it’s been a busy month.  And I put off vacation planning (leave for Germany, Amsterdam, and South Africa in one week with nothing but flights set up) to get it done.  Swedish Prinsesstårta: Challenge accepted.

The cake to make is elegant and light.  Just a simple sponge (with a rather odd ingredient: potato starch), pastry cream, whipped cream, and raspberry jam which I substituted with chocolate ganache, covered with marzipan though I forgot to buy some so I made white modeling chocolate instead.

The only problem I ran into while making the cake was the pastry cream.  Different recipe than I’m used to and it separated twice while over the heat.  My guess is that I cooked it too long, but it said to bring it to a boil and it never seemed to quite get there.  I had to stick with the results from the 2nd attempt because I ran out of eggs, so I put it in my kitchen aid mixer and beat the liquid back into the custard as well as I could.

When assembling the cake, I also chose to brush the sponge with a simple syrup because the recipe just didn’t sound sweet enough.  And I added mini chocolate chips in the top layer for a bit of crunch (and duh!  Because chocolate makes everything better). It all came together well and made for quite a pretty cake.  Didn’t have time to go all out on the decorations so I piped a couple of chocolate butterflies and made a single flower out of modeling chocolate.

Hate to rush, but I must get back to planning my trip.  So much to do!!!

Korena of Korena in the Kitchen was our May Daring Bakers’ host and she delighted us with this beautiful Swedish Prinsesstårta!

Read Full Post »

Hello hello!  It’s been some crazy busy few months, but I’m back, baby!  No more half-assed, thrown together, just to say I made it, baking challenges.  If you don’t know already, I love the Daring Baker’s Challenges at the Daring Kitchen.  I’ve learned so many great recipes (and some that I have no desire to make again, honestly) of desserts I had never even heard of.  This month’s challenge was no different.

Savarin.  Say what?  Yeah, well it’s a rich yeast cake that’s soaked in a liquid and served with lightened pastry cream and fruit.

So I’ve been traveling a lot lately.  I had to carefully plan out the day I would make this cake.  However, days off where I am home and not jet-setting are becoming few and far between so by the time I finished all my needed errands, it was 4 pm.  FYI . . . it is impossible to start making a yeasted cake at 4 pm unless you intend to stay up until 4 am.

The cake really isn’t hard to make, thanks to the good ol’ Kitchen Aid.  But with all the rising time involved, I only had time to bake the cake itself.  Then it went into the freezer while I went off to New York for the weekend.

Picked it back up the next week, making the pastry cream and the syrup to soak it in.  Now the syrup . . . I probably should have looked up a different recipe.  But I went with the one provided in the challenge.  It tastes a lot like tea.  I think a spiced rum would have been better.  But nonetheless, that cake was thirsty.  Crazy how much liquid it soaked up.  And I don’t think I had enough time to let the excess drip off because the piece I tried tasted more like a sweet tea sponge.  But maybe a day in the fridge will help.

I think all this cake really needed was a cup of simple syrup.  It kind of reminded me of a spongy angel food cake with the cream and berries, but the peach syrup was just too much liquid.  If I make it again (which is a big “if” since the cake takes so long to make), I will make a different syrup and use much less of it.

Read Full Post »

This will be a quick post because I left this month’s challenge at the Daring Kitchen up until the very last minute.  I haven’t been able to make the last 2 or 3 challenges so I really wanted to jump back in.  I’ve been extremely busy as of late, especially this month.  I spent 5 days in Ireland, 7 days on a cruise, and turned 30 years old (ugh!).

My head has been on vacation as well.  We found out that my parent’s dog Luke (who I pretty much consider my dog too) has cancer and it’s been a rough week.  My dad noticed a red spot inside his nose which despite various medications was not getting better.  After several tests, they found it was cancerous.  We took him to a surgeon today for a nosectomy.  It’s like it sounds, they had to remove his nose for his best chance of beating the cancer.  Still haven’t seen him yet because he’s staying overnight, but it’s really all I can think about today so I’m sorry my post is more about him than my challenge.  But the staff at the clinic inform us that he’s doing well, awake and alert but on morphine to manage the pain.  He’s the best dog in the world, I really could go on and on about him, but I’ll refrain.  Please keep him in your thoughts.

So this month’s challenge was to incorporate vegetables into baked goodies.  The obvious dish would be to make carrot cake.  But I’ve been wanting some zucchini bread for awhile so picked up zucchini on my way home from work tonight.

While looking up recipes on AllRecipes.com, I decided to make zucchini brownies instead.  Got out my mini food processor to basically puree the zucchini and whipped up some brownies, quick and easy.  Only modifications I made to the recipe were to use 6 tablespoons of butter and 1 tablespoon of olive oil instead of the vegetable oil, reduce the sugar to 1 cup, add an egg, and add 3/4 a cup of chocolate chips to the batter.  I also only made just over half the amount of frosting.

Final result?  Cake.  I tend to think of brownies as fudgey dense deliciousness.  This recipe yielded a light and fluffy chocolate cake.  Really couldn’t tell that zucchini was in it.  It was actually pretty good . . . just not brownies.

I hope to get back to business next month and dive into a good baking challenge.  I think things are calming down a bit so I should be able to find the time.  Until then, I will try to blog again with all the other creations that have come out of my kitchen since January.

Read Full Post »

Older Posts »