Feeds:
Posts
Comments

Archive for October, 2012

Pardon my french.  Phew!  It’s 1:45am on October 27, the day all Daring Bakers posts go up.  I was really looking forward to this month’s challenge, but I was doing a bit of traveling this month and with a focus on exercise, I couldn’t bring myself to make my favorite pastry in the world and not indulge.  That being said, it’s almost Halloween, so screw the diet!  Mmm . . . millefeuilles.

That’s right, the challenge this month was to make puff pastry dough (which I’ve done before), pastry cream (which I’ve done before), and layer the two in perfect harmony with each other (which I’ve never done).  I’ve wanted to make millefeuilles for quite some time so I’m glad I was able to pull it together so last minute.

For the puff pastry, I used the recipe from two years ago when us Daring Bakers were challenged to make vols-au-vent.  Just a quick YouTube refresher on turning the dough, that part of the process was done.

I also used an old standard for pastry cream that I highly enjoy, doubling the recipe because you can never really have too much pastry cream.  Check.

Two days later and back from a short trip to Austin to see Bob Schneider, it was time to put it all together. There wasn’t too much instruction on rolling out the pastry dough except that it should be about the thickness of cardboard.  Not wanting to waste all my dough, I baked one of the three layers on the first cookie sheet, rather than baking all the layers at the same time.  As noted, I put another cookie sheet on top of the dough to weigh it down and stuck it in the oven to bake at 200F.

Uh oh.  The dough was not doing anything after 15 minutes.  Looking at the instructions again, it said to bake at 200C /400F.  Whoops!  I upped the temp and thought I’d try to keep baking the first layer anyways.  It worked fine, but I found that I needed to use two cookie sheets to weigh the dough down.  Puff pastry just wants to rise and rise and rise.

After baking the next two layers, I started getting all the other components ready to go.  The recipe provided by our host used a royal icing to top off the millefeuilles.  First of all, I’ve been to France about ten times.  And each time, going to a Boulangerie/Patisserie to get a millefeuille tops my list of things to do.  Never have I had one with royal icing on top.  It always has a smooth, shiny glaze that sets up just enough but never hardens completely.  That’s what I wanted to top mine off with.

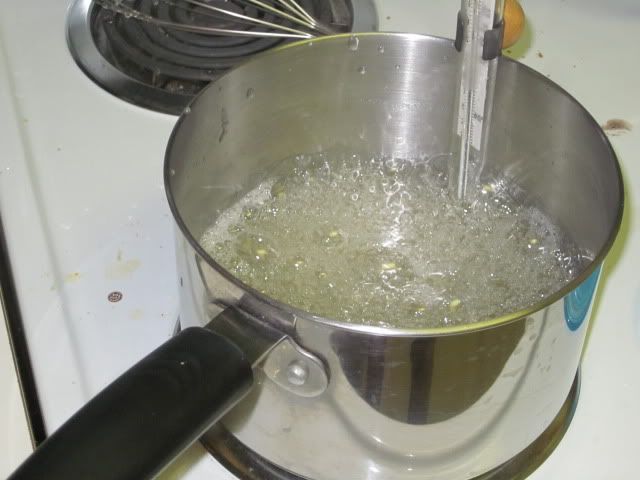
After some internet searching, I found what I was looking for is poured white fondant.  Only fondant I’m familiar with is that gross dough like mass that you roll out to cover cakes.  Yes, I know fondant is so mainstream now, but it’s really not tasty.  However, there exists a pourable fondant that is made by boiling sugar and water, then adding a little cream of tarter and corn syrup.

Running out of time, I really hoped I would get this white fondant down on the first try.  The boiling process went well, paying close attention to getting it to the right temperature and then back down to about 120F before working with it again.  From my research, I found that you can finish it in a stand mixer rather than hand pull/knead it.  It will change from clear and runny to white and thick.  I think I may have read the instructions wrong because after 7 minutes of mixing, it hadn’t changed color or texture much.  After a reread, I changed my beater to the dough hook and voila!  White and thick.

Now wait a minute!  This fondant is not pourable!

After yet some more research and stumbling upon this very helpful blog, I whipped up a simple syrup and incorporated it into the fondant and all was right in the world.

Assembly went well except that my pastry cream of choice is maybe a little too thin for millefeuilles.  And even though I doubled the recipe, they didn’t bulk up to the height I wanted.  Don’t get me started on cutting them!  I cut them in a few chunks but need to finish cutting them in single servings when I wake up, which hopefully will give the pastry cream a little bit more time to set up.  Plus, I don’t have any super sharp knives which makes cutting them even harder.

Now, today is my grandma’s 80th birthday and we’re going to the Arboretum to celebrate.  Normally, I would make a cake for the occasion.  And for an 80th birthday, I wanted to go big.  But walking around an Arboretum really doesn’t fit as a place to bring a large cake to.  So birthday millefeuilles it is!  And hopefully my grandma will enjoy these pastries as much as I do.

Our October 2012 Daring Bakers’ challenge was hosted by Suz of Serenely Full. Suz challenged us to not only tackle buttery and flaky puff pastry, but then take it step further and create a sinfully delicious Mille Feuille dessert with it!

Read Full Post »

So it’s been kind of an Irish month.  Okay, not really.  But I went to Globe, AZ in September and came across a bunch of cookbooks in an antique store.  I could have browsed for hours, but unfortunately didn’t have the time.  I did manage to find a sourdough book with a whole bunch of recipes using sourdough starter, which strangely enough is difficult to find online.  So I took my “friend” Paddy out of the refrigerator, freshened him up a bit, and made some sourdough bagels.

I’ve never made bagels before.  Using my starter had me worried as well since Paddy doesn’t seem to produce consistent results.  But at least this recipe didn’t require a 12+ hour rise, so if the end product wasn’t perfect, I wouldn’t be too disappointed.

So you boil and then bake bagels, eh?  Nifty process and it all went quite well.  I let my Kitchenaid mixer do the kneading, then left the dough to rise for about 3 hours.  Shaping the bagels was a cinch, then they rose for another 30 minutes before taking a boiling water bath.  I think the heat activated the yeast because they seemed to swell up well during the boil.  Then popped in the oven to finish before eating.  Texture wasn’t quite like I thought it would be for bagels, but they certainly made amazing ham, cheese, and avocado sandwiches.

A few weeks ago was my grandpa’s birthday.  His favorite cake is either chocolate with white frosting, or white with chocolate frosting.  I get kind of bored always doing the same kind of cakes, so I decided to experiment and make it a cookies and cream cake.  Chocolate cake and vanilla frosting would still be involved, but mixed in the frosting would be Oreos for a bit of a crunch.

Note to anyone wanting to try this: mix the Oreos in the frosting to help it all stick together.  I spread the frosting between the layers and then sprinkled cookie crumbs over it.  When cut, the layers didn’t hold together very well.  Overall, not my favorite cake.  I think the cookies just made me overly thirsty, so have a glass of milk nearby.  But a cookie crumb around the sides is a good solution when running out of frosting.

Just this past weekend, I went to see my good friends the Script (okay, they probably consider me more of a crazy fan) in San Diego and LA with my concert partner in crime, Jessica.  As always, I couldn’t show up empty handed.  But what kind of cookies should I make this time?  The list was long, but I settled on french macarons (now that I seem to have the hang of them), white chocolate dipped chocolate chip cookies, and sugar cookies (to get creative with).

The macarons turned out well, except the vanilla ones had to bake quite a bit longer because the bottoms kept sticking to the parchment.  I’m not done learning about these delicate and frustrating cookies yet, but they were definitely more than presentable.  I realized for the chocolate macarons, I didn’t have any heavy cream to make chocolate ganache.  I took a chance (because I didn’t want to go to the store) and tried a heavy cream substitute comprised of milk and butter and by George, it worked!  I think I actually liked the ganache better with the heavy cream substitute because… duh!  Butter makes everything better.

The chocolate chip cookies were delish!  I still go with the good ol’ Toll House recipe on the chocolate chip bag.  I’ve found that as long as you take them out of the oven when they’re just slightly browned and let them finish baking on the cookie sheet, they’re perfect.  If you let them bake too long, they seem to be a bit dry.

Now for the sugar cookie fun.  I’ve done the band’s instruments before, meticulously hand painted with food coloring, so I didn’t want to do that again.  Seeing as how their new record #3 just came out (you can buy it here or on iTunes), I went with a #3 song theme.  Millionaires translated into round cookies with a gold Euro and writing underneath.  Six Degrees of Separation was done by making cookies in the shape of thermometers that measured six degrees.  Hall of Fame was done with Hollywood Star cookies with the band members names on them.  A hand cookie cutter folding the outside fingers down created the 3 fingers up cookies.  And Broken Arrow were also round cookies with a sky background and painted broken arrows flying across.  I wanted to do Kaleidoscope cookies but figured each one would take about 30 minutes to hand paint.

The cookie drop didn’t go as well as hoped.  Jessica and I went to the venue early to try to catch one of the guys.  We saw the tour manager so should have just given them to him, but he seemed busy.  After soundcheck, a guy who works at the venue said they were sitting down for dinner so probably wouldn’t be out for awhile.  I almost gave them to him to see if he’d take them back, but doubted they’d be delivered.  When I told Jessica this, she said “You don’t give your cookies to just any one.”  And my response was “no, just musicians.”  Ladies and gentlemen, my new slogan was born.  Ha!

Fortunately a few minutes later, one of the band’s crew members walked out to the buses and took the cookies.  I’m still not sure if the band ever saw them though since they went on the crew bus.  Oh well.

Was a great couple of shows and so good to see those guys back at it.  Now my count is 10 Script shows and I’m eagerly awaiting the next one, which will most likely be Atlanta in a couple weeks or Vegas in a month and a half.  No, I don’t have a live music problem . . .


Sourdough Bagels:

  • 1 cup sourdough starter
  • 2 eggs
  • 3 tablespoons cooking oil
  • 2 1/2 cups all purpose flour
  • 1 teaspoon salt
  • 2 tablespoons sugar
  • 1 gallon water plus 2 tablespoons sugar

In a large mixing bowl combine sourdough starter with eggs and oil.  Mix together flour, salt, and sugar. Add to starter mixture.  Add enough additional flour for the dough to leave the sides of the bowl.  Turn out onto lightly floured surface and knead for 8-10 minutes or until smooth and elastic, adding more flour if necessary.  Cover with a cloth.  Set in warm place free from drafts until doubled in size, about 3 hours.

Turn out onto floured surface and divide into 8-10 pieces; shape into balls.  Punch a hole in center with a floured finger.  Form a doughnut shape by gently enlarging hole, working each bagel into uniform shape.  Cover and let rise for 30 minutes.

Add sugar to water and bring to a boil.  Drop each bagel into the boiling water one at a time.  Boil only 4-5 bagels at a time.  Cook for 7 minutes, turning once.  Drain; place on greased cookie sheets.  Bake at 375F for 25-35 minutes.  Bagels should be golden brown and crusty.

Read Full Post »